Reference:
https://support.rackspace.com/how-to/getting-started-with-cloud-sites-rackspace-nameservers-and-creating-custom-nameservers/
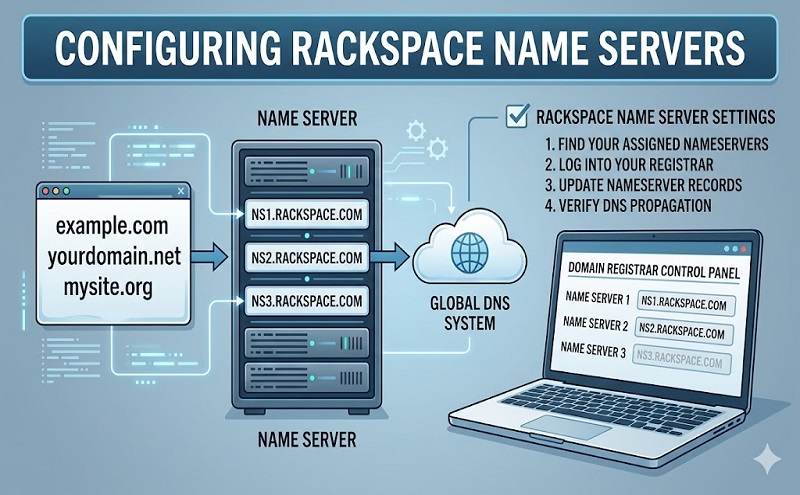
To change your name servers from your current registrar to point to the Rackspace Cloud, follow these steps:
- Access your account with your current registrar (for example, comor register.com).
- Change the name servers to stabletransit.comand dns2.stabletransit.com.
Custom name servers
Configuring custom name servers can be done differently depending on where your DNS is currently hosted. The following sections provide steps to set up custom name servers based on some of the most commonly used DNS providers:
- GoDaddy
- OpenSRS/Tucows/RackSpace Cloud
- Dotster
- eNom
- Directi
- com
If you are hosting DNS at a provider that is not listed here, contact your DNS provider for steps showing you how to configure custom name servers.
GoDaddy
https://support.rackspace.com/how-to/create-dns-records-for-cloud-servers-with-the-control-panel/
Create DNS Records for cloud servers with the Control Panel
- Last updated on: 2016-04-13
- Authored by: Rackspace Support
Previous section: Getting Started with Cloud Servers
This article provides instructions for creating a DNS zone for your domain and adding basic A, MX, and CNAME records by using the Cloud Control Panel.
To learn more about A, MX, and CNAME records for Cloud Sites, see Getting started with Cloud Sites – Managing DNS records.
DNS servers for cloud servers
Following are the DNS servers for your cloud servers:
- stabletransit.com
- stabletransit.com
Create a DNS zone for your domain
- Log in to theCloud Control Panel.
- SelectNetworking > Cloud DNS.
- Continue with the following procedures to create the records for your domain’s DNS zone.
Add a domain
- ClickCreate Domain.
- In the popup dialog box, enter the following information:
- Name of your domain.
- Email address publicly associated as the admin and contact for the domain.
- Time to live (TTL) for the domain.
- ClickCreate Domain.
Add an A record
An A record is an IPv4 address record that you use to point your domain to an IP address. It is also known as an A name.
- On the Cloud DNS page, click the gear icon next to your domain and selectAdd DNS Record.
- In the popup dialog box, selectA/AAAA Record for the record type.
- Enter the following information:
- The hostname for your domain (optional).
- Target (IP address of the server).
- Time to live (TTL). The TTL refers to the time it will take for your computer to refresh DNS information. It is referred to in seconds of time.
- ClickAdd Record.
Add a CNAME record
A CNAME record, also known as a canonical name record, is a record type in the DNS that you use to indicate that your domain name is an alias for your domain’s canonical name. Subdomains and IP addresses for your domain are defined by the canonical domain.
Use a CNAME record to point to another record.
- Click the action gear next to your domain and clickAdd DNS Record.
- SelectCNAME Record for the record type.
- Enter the following information:
- The hostname for your domain (optional).
- Target (for your domain)
- Time to live (TTL). The TTL refers to the time it will take for your computer to refresh DNS information. It is referred to in seconds of time.
- ClickAdd Record
Add an MX record
Use the Mail Exchange (MX) is a DNS record that points to the server that handles your domain-related email delivery. You create an MX record for your domain that allows you to set up an email address. For example, you can create an MX record to create the email address user@yourdomain.com. You can send email without setting up the MX record for your domain name, but you cannot receive emails without it.
- On the Cloud DNS page, click the gear icon next to your domain and selectAdd DNS Record.
- In the popup dialog box, selectMX Record for the record type.
- Enter the following information:
- The hostname for your domain (optional).
- Domain of the mail server.
- The MX record priority is a setting you will use when your domain name uses more than one mail server. The priority that you set for your MX record affects the load sharing and the order in which multiple mail servers are used, and also allows the use of primary and backup mail servers.
- Time to live (TTL). TTL refers to the time it will take for your computer to refresh DNS information. It is referred to in seconds of time.
- ClickAdd Record.
Delete a record from your domain
- On the Cloud DNS page, click the name of the domain.
- On the domain page, scroll down to theRecords section, and choose one of the following methods to delete a record:
- Select the check box next to the record that you want to delete, clickActions, and select Delete records. You can use this method to delete multiple records at once.
- Click the gear icon next to the record and selectDelete Record.
Delete a domain
Use one of the following methods to delete a domain on the Cloud DNS page.
- Click the gear icon next to the domain, and selectDelete Domain.
- Select the check box next to the domain and clickDelete at the top of the domain list.