May 10, 2022 . 8 MIN READ
The SSH File Transfer Protocol (also Secure File Transfer Protocol, or SFTP) is a network protocol that provides file access, file transfer, and file management over any reliable data stream. It is a file transfer protocol that leverages a set of utilities that provide secure access to a remote computer to deliver secure communications. It leverages SSH (Secure Socket Shell or Secure Shell) and is frequently also referred to as Secure Shell File Transfer Protocol.
The File Transfer Protocol is a standard communication protocol used for the transfer of computer files from a server to a client on a computer network (including the Internet). FTP is built on a client–server model architecture using separate control and data connections between the client and the server.
FTP has always been popular for staring or moving large files between systems. Files can be added to a central server, then users who wants to access them can access them from there.
SFTP is aimed at providing enhanced security with tunneling using Secure Shell 2 (SSH2), a secure tunneling protocol. It emulates an FTP connection and provides a firewall friendly and encrypted channel for file transfers using TCP port 22.
SSH offers enhanced security by having the entire file transfer session, including all session control commands, entirely encrypted at all times while only requiring a single port be opened on your firewall versus the two ports that need to be opened for FTP and SSL connections.
As an added feature, Secure FTP also compresses all data during the transmission, which can result in faster file transfers.
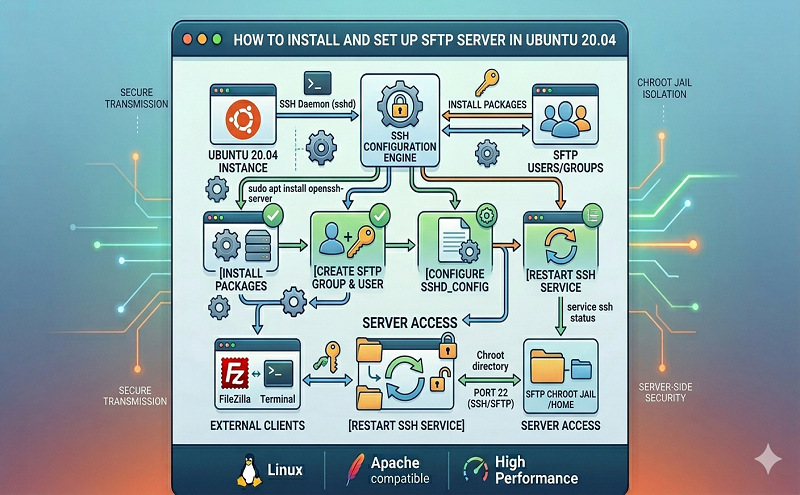
This guide will take you through the process of installing and setting up SFTP server in Ubuntu 20.04. We will go through these steps:
sftp and ssh Software in UbuntuWe need to have the software providing the ssh and sftp server software in our Ubuntu
Ensure you machine is updated:
sudo apt update
sudo apt upgrade -y
Since sftp is dependent on ssh, we will need to install either SSH or OpenSSH if none of them is already installed in your machine.
Install the ssh daemon:
sudo apt install sshOutput
$ sudo apt install ssh
Reading package lists... Done
Building dependency tree
Reading state information... Done
The following packages were automatically installed and are no longer required:
  libllvm11 libxdamage1
Use 'sudo apt autoremove' to remove them.
The following NEW packages will be installed:
  ssh
0 upgraded, 1 newly installed, 0 to remove and 0 not upgraded.
Need to get 5,084 B of archives.
After this operation, 120 kB of additional disk space will be used.
Get:1 http://ports.ubuntu.com/ubuntu-ports focal-security/main arm64 ssh all 1:8.2p1-4ubuntu0.2 [5,084 B]
Fetched 5,084 B in 0s (26.8 kB/s)
Selecting previously unselected package ssh.
(Reading database ... 104454 files and directories currently installed.)
Preparing to unpack .../ssh_1%3a8.2p1-4ubuntu0.2_all.deb ...
Unpacking ssh (1:8.2p1-4ubuntu0.2) ...
Setting up ssh (1:8.2p1-4ubuntu0.2) ...We need to create a user and a group that will login to the SFTP server.
sftpgroup1
sudo addgroup sftpgroup1Output:
# sudo addgroup sftpgroup1
Adding group 'sftpgroup1' (GID 1002) ...
Done.sftpuser1 for the user.
sudo useradd -m sftpuser1 -g sftpgroup1sudo passwd sftpuser1Output:
# sudo passwd sftpuser1
New password:
Retype new password:
passwd: password updated successfullysudo chmod 700 /home/sftpuser1/You need to configure the ssh service to accept sftp traffic. Add the following configs to the ssh config file located here /etc/ssh/sshd_config:
In your terminal, use this command to open the config file with vim:
sudo vim /etc/ssh/sshd_configNow add this content to the bottom of the file:
Match group sftpgroup1
ChrootDirectory /home
X11Forwarding no
AllowTcpForwarding no
ForceCommand internal-sftp
The above configurations is meant to allow users in the sftpgroup1 group (Match group sftpgroup1) to access and use their home directories via the SFTP while preventing any other normal SSH access to those files.
Save and close the SSHD configuration file.
restart the SSH service to apply previous changes.
sudo systemctl restart sshYou can use the command line terminal to test your login to the SFTP. This can even be done locally in the sftp server.
This is the format of the login command:
sftp [user]@[host]Lets connect to our server. your SFTP username and password will be needed.
sftp sftpuser1@127.0.0.1Output:
$ sftp sftpuser1@127.0.0.1
The authenticity of host '127.0.0.1 (127.0.0.1)' can't be established.
ECDSA key fingerprint is SHA256:99KvuL95zO2CQbC8X0Re/Q+cYrJgqQgzpf1leemnjmY.
Are you sure you want to continue connecting (yes/no/[fingerprint])? yes
Warning: Permanently added '127.0.0.1' (ECDSA) to the list of known hosts.
sftpuser1@127.0.0.1's password:
Connected to 127.0.0.1.
sftp>
This will log you in the server. The default directory is the /home dir specified in the ChrootDirectory /home directive in the ssh server configs.
sftp> version
SFTP protocol version 3
sftp>If you need to check the current working directory on the remote server, the pwd command comes in handy:
sftp> pwd
Remote working directory: /sftpuser1
sftp>To show the local system’s present working directory use lpwd command.
sftp> lpwd
Local working directory: /home/ubuntu
sftp>
The created user will only have access to its directory. Lets switch to that directory with the following command:
sftp> cd sftpuser1
sftp>
Move to the SFTP user home directory and try to create a new directory as following:
sftp> ls
sftpuser1  ubuntu
sftp> cd sftpuser1
sftp> ls
sftp> mkdir datadir
sftp> ls
datadir
Upload files to a remote server using this command syntax:
$ sftp {user}@{host}:{remote-path} <<< $'put {local-path}'Example:
$ sftp sftpuser1@127.0.0.1:/sftpuser1/ <<< $'put ./citizix.txt'
sftpuser1@127.0.0.1's password:
Connected to 127.0.0.1.
Changing to: /sftpuser1/
sftp> put ./citizix.txt
Uploading ./citizix.txt to /sftpuser1/citizix.txt
./citizix.txtUse these commands: ls to list files, lls for local list, put for uploading files:
sftp>
sftp> pwd
Remote working directory: /sftpuser1/datadir
sftp> ls
sftp> lls
citizix.txt  snap  tmp
sftp> put citizix.txt
Uploading citizix.txt to /sftpuser1/datadir/citizix.txt
citizix.txt                                                            100%   32    25.8KB/s   00:00
sftp> ls
citizix.txt
sftp>
To upload multiple files in one go, we can use mput command like in the example below. You can use mput with regular expression like data[23] to upload data2, data3 and ignore data1. You can use any wildcard or regular expression with mput.
sftp>
sftp> pwd
Remote working directory: /sftpuser1/data
sftp> ls
sftp> lls
data1  data2  data3
sftp> mput data[23]
Uploading data2 to /sftpuser1/data/data2
data2                                                                  100%    0     0.0KB/s   00:00
Uploading data3 to /sftpuser1/data/data3
data3                                                                  100%    0     0.0KB/s   00:00
sftp> ls
data2 data3To download a file from a remote server, use the below command syntax:
$ sftp {user}@{remote-host}:{remote-file-name} {local-file-name}Here’s a demo of downloading a file in one line using sftp:
# sftp sftpuser1@127.0.0.1:/sftpuser1/citizix.txt .
sftpuser1@127.0.0.1's password:
Connected to 127.0.0.1.
Fetching /sftpuser1/citizix.txt to ./citizix.txt
/sftpuser1/citizix.txt 100% 32 26.7KB/s 00:00Download single file from the server using get. Example downloading data2
sftp>
sftp> ls
data2  data3
sftp> lls
sftp> get data2
Fetching /sftpuser1/data/data2 to data2
sftp> lls
data2
sftp>
Use mget to download multiple files like in this example
sftp>
sftp> ls
data2  data3
sftp> lls
sftp> mget data*
Fetching /sftpuser1/data/data2 to data2
Fetching /sftpuser1/data/data3 to data3
sftp> lls
data2  data3
sftp>Use the commands mkdir and rmdir to create and delete directories
sftp>
sftp> ls
sftp> mkdir data
sftp> ls
data
sftp> rmdir data
sftp>Use the command rm to delete files
sftp> rm data*
Removing /sftpuser1/data/data2
Removing /sftpuser1/data/data3
sftp>sftp>
sftp> ls
data3
sftp> rename data3 data_original
sftp> ls
data_original
sftp>Display statistics for the current directory or filesystem containing ‘path’, use df command. We can use -h flag to show statistics in a human-readable format. Do note that the statistics shown are for the remote SFTP server’s respective filesystem and not the local machine’s filesystem.
sftp> df
        Size         Used        Avail       (root)    %Capacity
    29540600      5917856     22103188     23622744          20%
sftp> df -h
    Size     Used    Avail   (root)    %Capacity
28.2GB 5.6GB 21.1GB 22.5GB 20%To get help about available commands and syntax for SFTP, use ‘?‘ or ‘help‘.
sftp> ?Output:
sftp> ?
Available commands:
bye                                Quit sftp
cd path                            Change remote directory to 'path'
chgrp [-h] grp path                Change group of file 'path' to 'grp'
chmod [-h] mode path               Change permissions of file 'path' to 'mode'
chown [-h] own path                Change owner of file 'path' to 'own'
df [-hi] [path]                    Display statistics for current directory or
                                   filesystem containing 'path'
exit                               Quit sftp
get [-afpR] remote [local]         Download file
help                               Display this help text
lcd path                           Change local directory to 'path'
lls [ls-options [path]]            Display local directory listing
lmkdir path                        Create local directory
ln [-s] oldpath newpath            Link remote file (-s for symlink)
lpwd                               Print local working directory
ls [-1afhlnrSt] [path]             Display remote directory listing
lumask umask                       Set local umask to 'umask'
mkdir path                         Create remote directory
progress                           Toggle display of progress meter
put [-afpR] local [remote]         Upload file
pwd                                Display remote working directory
quit                               Quit sftp
reget [-fpR] remote [local]        Resume download file
rename oldpath newpath             Rename remote file
reput [-fpR] local [remote]        Resume upload file
rm path                            Delete remote file
rmdir path                         Remove remote directory
symlink oldpath newpath            Symlink remote file
version                            Show SFTP version
!command                           Execute 'command' in local shell
!                                  Escape to local shell
?                                  Synonym for help
Refer sftp man page for further reading.
$ man sftpFinally, you can exit the sftp using the bye, exit, or quit:
sftp> exit
$In this guide we managed to set up an sftp server and explored basic operations that can be done on the server
Reference:
https://citizix.com/how-to-install-and-set-up-sftp-server-in-ubuntu-20-04/
https://www.vultr.com/docs/setup-sftp-user-accounts-on-ubuntu-20-04/


