March 30, 2022 . 3 MIN READ
default Ubuntu 12.04 LTS doesn’t create swap for some reason. Is there “proper” way to add it after install?
root@aux3:/root# df -h
Filesystem Size Used Avail Use% Mounted on
/dev/xvda1 8.0G 1.4G 6.3G 18% /
udev 1.9G 12K 1.9G 1% /dev
tmpfs 751M 188K 750M 1% /run
none 5.0M 0 5.0M 0% /run/lock
none 1.9G 0 1.9G 0% /run/shm
/dev/xvdb 394G 79G 296G 21% /mnt
root@aux3:/root# swapon -s
Filename
root@aux3:/root# free -m
total used free shared buffers cached
Mem: 3750 3730 20 0 75 3433
-/+ buffers/cache: 221 3528
Swap: 0 0 0
root@aux3:/root#
Update: found temporary solution via swap file:
(I’m still looking for “proper” way though)
dd if=/dev/zero of=/mnt/swap1 bs=1024 count=4M
mkswap /mnt/swap1
chown root.root /mnt/swap1
chmod 600 /mnt/swap1
swapon /mnt/swap1
The t1.micro instance comes with only 602MB of memory. Especially under high load, it is quite easy to deplete the available memory – and since no swap space is enabled by default, this can quickly lead to a server becoming unresponsive. Swap space can also allow the kernel to move unused data out of memory, putting the main memory to better use. None the less, swap should not be seen as a replacement for memory, but rather an extension – a way to get a bit more out of the available memory.
Ideally, swap space would be allocated to an ephemeral volume, since the data does not need to persist, and there is no charge for I/O operations. However, since the t1.micro instance does not support ephemeral disks (and is, arguably, the instance most in need of swap space) we will look at setting up swap space on an EBS volume, below.
We start by creating an EBS volume – the smallest size is 1GB, which should be more than enough.
Attach the EBS volume to the instance – note the device you set it to (in my case, /dev/xvdg).
Setup the swap area (the -f option is to force the command to proceed – omit it if you are unsure about the target):
mkswap -f /dev/xvdg
In order to have the swap space available after a boot, we edit /etc/fstab, adding the line below:
/dev/xvdg swap swap defaults 0 0
Finally, we can turn on swap (without a reboot), but issuing the command below.
swapon /dev/xvdg
You can verify that the swap space is active with the ‘free’ command. As an example, the output below is from one of my t1.micro instances that has been running for 15 days. The last line shows swap (1GB), and a few (20) megabytes have been used.
free -m total used free shared buffers cachedMem: 602 576 25 0 48 347-/+ buffers/cache: 181 421Swap: 1023 20 1003
You can disable swap using the swapoff command, for example:
swapoff /dev/xvdg
Keep in mind that if your swap space is being heavily used, it is probably affecting the performance of your application significantly. Also, with an EBS volume, you will be incurring a cost for every I/O operation. There is nothing wrong with swapping out pages, as long as it isn’t occuring frequently. You can configure the ‘swappiness’ of your system, by echoing out a value from 0 to 100 into /proc/sys/vm/swappiness. Low numbers reduce the system’s tendency to swap. One view point is that the lower numbers increase perceived responsiveness for a desktop, but higher numbers allow memory to be best used on a server environment.
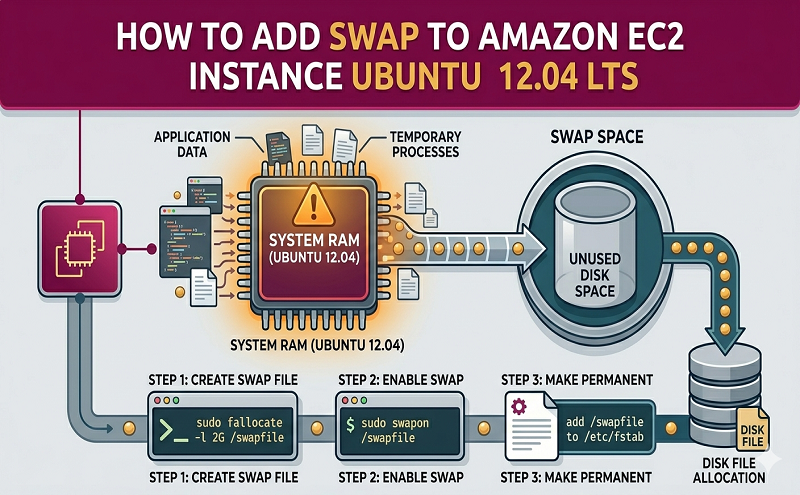
1GB of swap should be enough. So create your swap file in the root of your filesystem:
| 1
2 3 4 |
[root@aws ~]# dd if=/dev/zero of=/swapfile bs=1M count=1024
1024+0 records in 1024+0 records out 1073741824 bytes (1.1 GB) copied, 37.1842 s, 28.9 MB/s |
You then need to format and create a swap filesystem inside of the new file:
| 1
2 3 4 5 |
[root@aws ~]# mkswap /swapfile
mkswap: /swapfile: warning: don’t erase bootbits sectors on whole disk. Use -f to force. Setting up swapspace version 1, size = 1048572 KiB no label, UUID=be7b0773-9c05-4c85-81ad-b3b0150ccef9 |
Once that’s done, it’s time to mount the new swap file:
| 1 | [root@aws~]# swapon /swapfile |
If all has gone to plan, make sure the server mounts the new swap file at system startup by adding the following to your /etc/fstab file using your favourite editor:
| 1 | /swapfile swap swap defaults 0 0 |
That’s it. Enjoy your new AWS server with added umfff. Well, almost.
Reference: https://www.digitalocean.com/community/articles/how-to-add-swap-on-ubuntu-14-04
http://stackoverflow.com/questions/11350985/how-to-add-swap-to-amazon-ec2-instance-ununtu-12-04-lts


