February 23, 2022 . 7 MIN READ
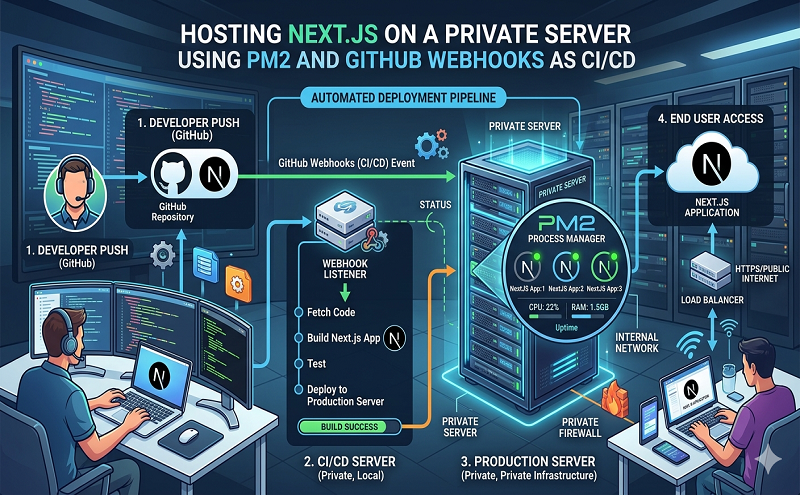
This article shows you how can host your Next.js site on a (virtual private) server with Nginx and a CI/CD pipeline via PM2 and Github Webhooks.
First of all, you need a server with root access. I strongly recommend having a look at the guide “Initial Server Setup with Ubuntu 18.04” from the DigitalOcean community which will lead you through the process of:
After you have done that you can continue by installing all necessary dependencies on your server.
Again there is a guide by DigitalOcean which will help you install Node.js using PPA.
After completing
you will have to change npm’s default directory.
cd ~mkdir ~/.npm-globalnpm config set prefix ‘~/.npm-global’
sudo nano ~/.profile# set PATH so global node modules install without permission issues export PATH=~/.npm-global/bin:$PATH
Now you have to update your system variables:
source ~/.profile
Now you should be able to check your installed Node.js version with:
node -v
Check if git is already installed with:
git –version
If it isn’t installed yet follow the guide on How to install git on Ubuntu 18.04.
After git is installed you can deploy your project by cloning it from Github.
It is important that you are logged in as a non-root user for the following steps.
cd ~git clone https://github.com/your-name/your-project-repo.git path
Create a .env on the server if you are using one locally and copy/paste your content.
After you have deployed your project (optionally with environment variables) you can install all dependencies and build your Next.js site with:
cd ./my-project/npm installNODE_ENV=production npm run build
Now you should have a copy of your local project/Next.js site on your remote server.
Next, you are going to set up PM2 which will be used to keep your site alive and restart it after every reboot.
You can install PM2 with:
npm install pm2@latest -g
You will need to create/configure an ecosystem.config.js file which will restart the default Next.js server.
cd ~pm2 initsudo nano ecosystem.config.js
Copy/paste the template and replace the content.
module.exports = { apps: [ { name: ‘next-site’, cwd: ‘ /home/your-name/my-nextjs-project’, script: ‘npm’, args: ‘start’, env: { NEXT_PUBLIC_…: ‘NEXT_PUBLIC_…’, }, }, // optionally a second project],};
With
cd ~pm2 start ecosystem.config.js
you can start your server which will run on the Port 1337.
You can always check the status with:
pm2 status next-site
After the server reboots this PM2 should be always automatically be restarted. For that, you are going to need a small Startup script that you can also copy/paste.
cd ~pm2 startup systemd [PM2] Init System found: systemd[PM2] To setup the Startup Script, copy/paste the following command:**sudo env PATH=$PATH:/usr/bin /usr/lib/node_modules/pm2/bin/pm2 startup systemd -u your-name –hp /home/your-name**
**sudo env PATH=$PATH:/usr/bin /usr/lib/node_modules/pm2/bin/pm2 startup systemd -u your-name –hp /home/your-name** [PM2] Init System found: systemdPlatform systemd . . . [PM2] [v] Command successfully executed.+—————————————+[PM2] Freeze a process list on reboot via: $ pm2 save [PM2] Remove init script via: $ pm2 unstartup systemd
pm2 save [PM2] Saving current process list…[PM2] Successfully saved in /home/your-name/.pm2/dump.pm2
If you reboot your server now with Sudo reboot the script should automatically restart your Next.js site. Give it a try!
One thing missing now is a continuous integration and continuous delivery (CI/CD) pipeline which you will set up using Github webhooks.
Therefore you need to create a new Webhook in your repository.
The following articles provide additional information to the steps below:
You need to create a server script that will do something if it is triggered by the Github webhook.
cd ~mkdir NodeWebHookscd NodeWebHookssudo nano webhook.js
The script is going to create a server running on port 8100. (Your Github webhook should be of course sending the webhook to something like http://server-ip:8100.)
If it gets triggered by a webhook it will
const secret = “your-secret-key”;const repo = “~/my-nextjs-project/”; const http = require(‘http’);const crypto = require(‘crypto’);const exec = require(‘child_process’).exec; const BUILD_CMD = ‘npm install && NODE_ENV=production npm run build’;const PM2_CMD = ‘pm2 restart next-site’; http.createServer(function (req, res) { req.on(‘data’, function(chunk) { let sig = “sha1=” + crypto.createHmac(‘sha1’, secret).update(chunk.toString()).digest(‘hex’); if (req.headers[‘x-hub-signature’] == sig) { exec(‘cd ‘ + repo + ` && git pull && npm install && ${BUILD_CMD} && ${PM2_CMD}`); } }); res.end();}).listen(8100);
You will need to allow communication on Port 8100 with:
sudo ufw allow 8100/tcpsudo ufw enable Command may disrupt existing ssh connections. Proceed with the operation (y|n)? firewall is active and enabled on system startup
Earlier you set up PM2 to restart the services (your Next.js site) whenever the server reboots or is started. You will now do the same for the webhook script.
echo $PATH /home/your-name/.npm-global/bin:/home/your-name/bin:/home/your-name/.local/bin:/usr/local/sbin:/usr/local/bin:/usr/sbin:/usr/bin:/sbin:/bin:/usr/games:/usr/local/games:/snap/bin
cd ~sudo nano /etc/systemd/system/webhook.service
[Unit]Description=Github webhookAfter=network.target [Service]Environment=PATH=your_pathType=simpleUser=your-nameExecStart=/usr/bin/nodejs /home/your-name/NodeWebHooks/webhook.jsRestart=on-failure [Install]WantedBy=multi-user.target
sudo systemctl enable webhook.servicesudo systemctl start webhook
sudo systemctl status webhook
You can test your webhook with these [instructions]((https://www.digitalocean.com/community/tutorials/how-to-use-node-js-and-github-webhooks-to-keep-remote-projects-in-sync#step-4-testing-the-webhook “Test Webhook”).
The Next.js server is now running on your-ip:3000 and you implemented a CI/CD pipeline via PM2 and Github Webhooks but you still can’t access your website via a domain because you need to configure a web server like Nginx.
I am using Cloudflare to manage DNS for my domains but you can do this with every other provider also.
After that, you will need to configure Nginx.
The following instructions are based on [How To Install Nginx on Ubuntu 18.04 [Quickstart]]((https://www.digitalocean.com/community/tutorials/how-to-install-nginx-on-ubuntu-18-04-quickstart “How To Install Nginx on Ubuntu 18.04 [Quickstart]”).
sudo apt update
sudo apt install Nginx
sudo ufw allow ‘Nginx Full’sudo ufw delete allow ‘Nginx HTTP’
You should now be able to see the Nginx landing page on:
http://your_server_ip
sudo mkdir -p /var/www/your-domain.com/html
sudo chown -R $USER:$USER /var/www/your-domain.com/html
sudo chmod -R 755 /var/www/example.com
sudo nano /etc/nginx/sites-available/example.com
server { # Listen HTTP listen 80; listen [::]:80; server_name your-domain.com www.your-domain.com; # Redirect HTTP to HTTPS return 301 https://$host$request_uri;} server { # Listen HTTP listen 443 ssl; listen [::]:443 ssl; server_name your-domain.com www.your-domain.com; # SSL config include snippets/self-signed.conf; include snippets/ssl-params.conf; # Proxy Config location / { proxy_pass http://localhost:3000 proxy_http_version 1.1; proxy_set_header X-Forwarded-Host $host; proxy_set_header X-Forwarded-Server $host; proxy_set_header X-Real-IP $remote_addr; proxy_set_header X-Forwarded-For $proxy_add_x_forwarded_for; proxy_set_header X-Forwarded-Proto $scheme; proxy_set_header Host $http_host; proxy_set_header Upgrade $http_upgrade; proxy_set_header Connection “Upgrade”; proxy_pass_request_headers on; } location ~ /.well-known { allow all; }}
Save the file and close it when you are finished.
sudo ln -s /etc/nginx/sites-available/your-domain.com /etc/nginx/sites-enabled/
sudo nginx -t
sudo systemctl restart nginx
Nginx should now be serving content on your domain name. That means if you have a look at http://your-domain.com you should see your Next.js site.
In the end should deny traffic to Port 3000 with:
cd ~sudo ufw deny 3000
This guide is also using parts of Strapi Deployment on DigitalOcean which helped me a lot setting up Strapi and Next.js on a server in a proper way.
Reference: https://mxd.codes/articles/hosting-next-js-private-server-pm2-github-webhooks-ci-cd


