July 9, 2021 . 4 MIN READ
Step 1: Setup your Rails Environment
First, we’re going to need to create the environment in which our rails application will live. Head to your cPanel, and access the Ruby on Rails icon from the Software/Services group.
This is your Ruby on Rails control panel. Here, we’re going to create our application environment- give it a name. In this instance I’m going to call mine ‘redmine’ since I’m going to be hosting a Redmine application! cPanel will fill in the application path, so just tick the ‘Load on Boot?’ box, make sure your environment is set to ‘production’ and click ‘Create’.

This will create a directory at /home/[your username]/rails_apps/[app name] For me, since my username is cubecity, this directory is called /home/cubecity/rails_apps/redmine
Note: It’s best to install this on a domain or subdomain, as redmine will often not work correctly with the default rewrite in a subfolder.
Step 2: Download/Extract your application
First, head to your application’s webpage, and download the application. In this instance, I’m going to go to http://rubyforge.org/projects/redmine/ to download Redmine.
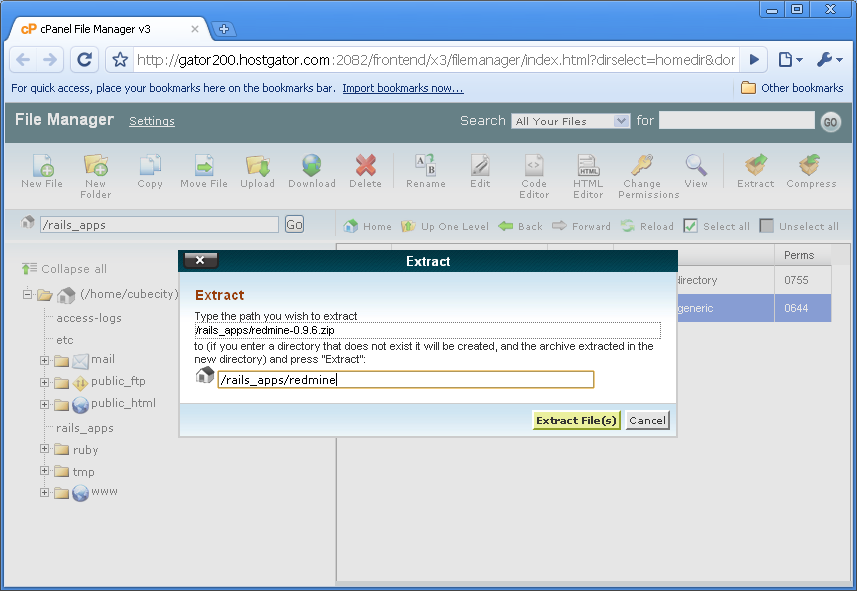
Upload your application zip file to your rails_apps directory in your home directory, as shown in the folllowing figure.

Unzip the file:
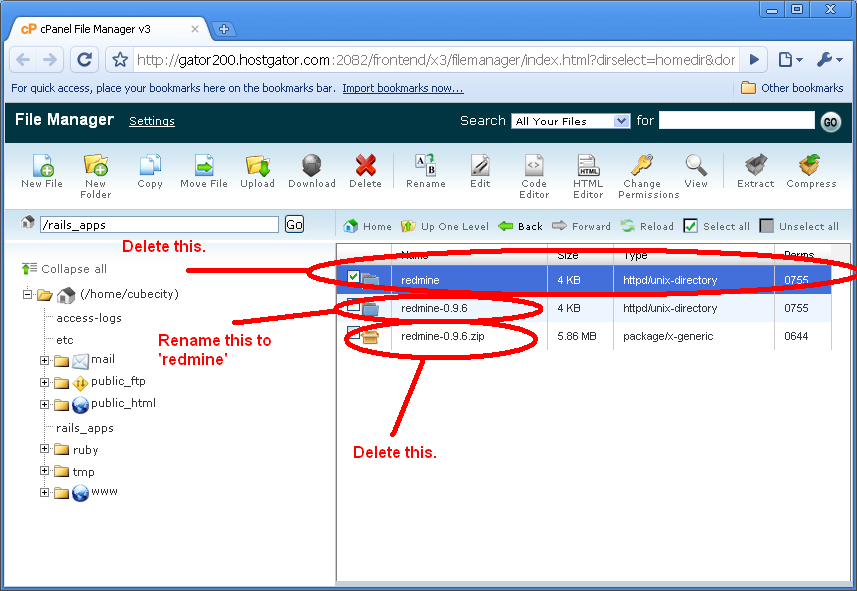
This next part goes as follows. First, delete the ‘redmine’ directory in its entirety. Second, rename the directory you unzipped to ‘redmine’. Essentially, we’re replacing the default cPanel redmine directory with our downloaded one. Third, delete your zip file for basic housekeeping. See the following figure for clarification.
Now we’re done with step 2. Let’s set up our database.
Step 3: Setup database/database user
Head back to cPanel. Go to MySQL Databases under the Databases group.
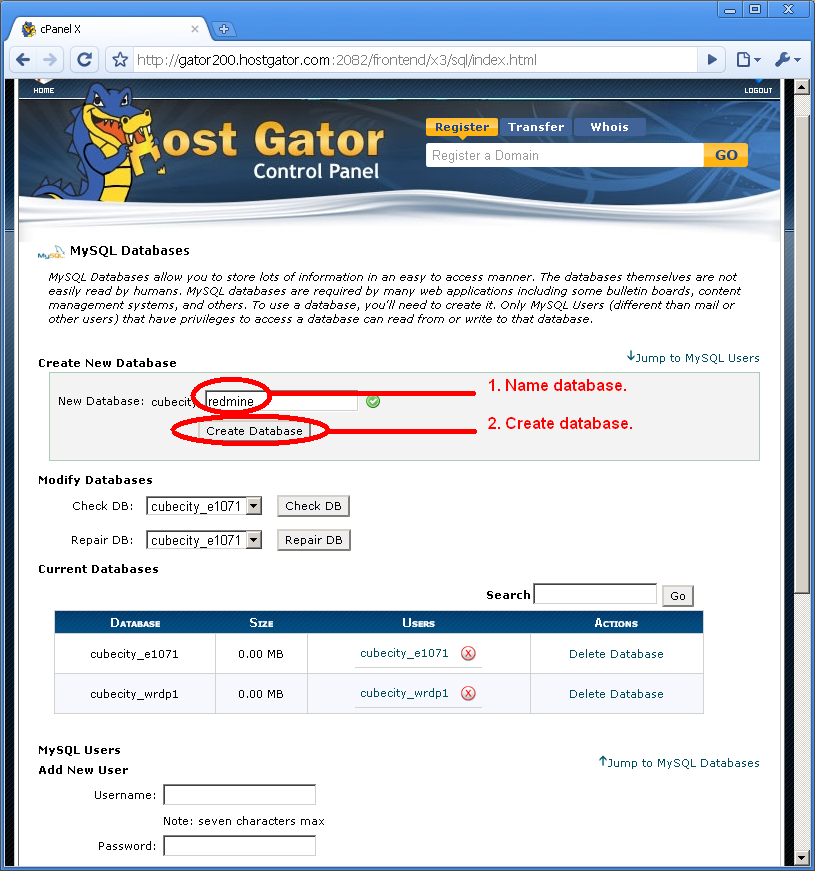
First, let’s create a new MySQL database. Under the Create New Database section, make a new database. Choose a name for your MySQL database, and click on ‘Create Database’ as in the below figure:
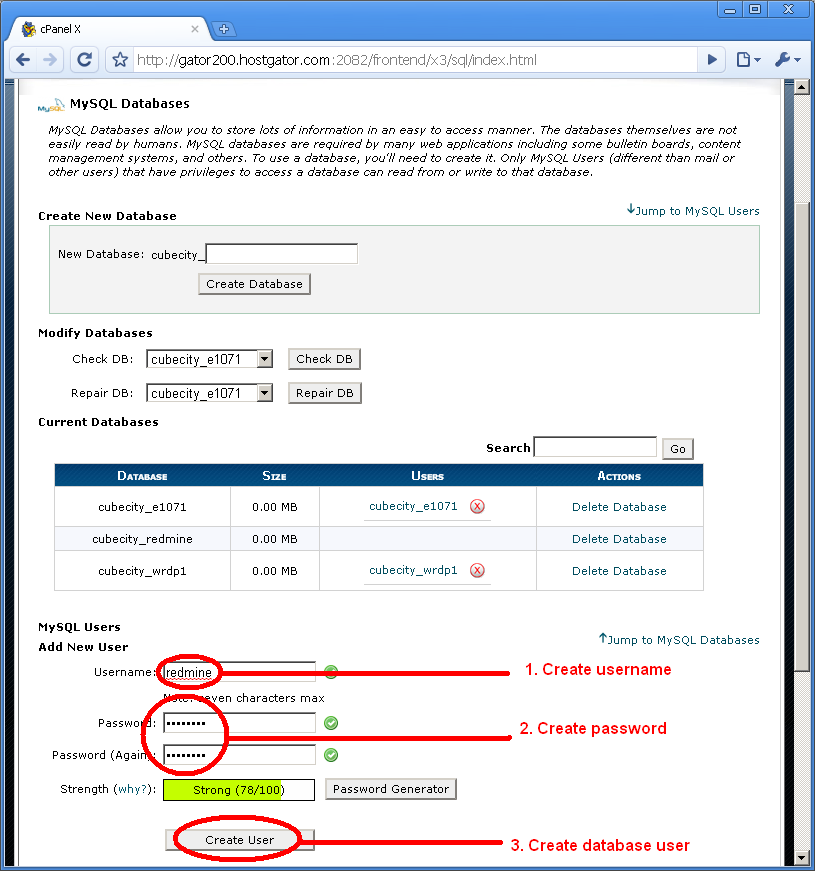
I’m calling mine redmine. Also, create a MySQL user. Scroll down to the MySQL Users section, and begin filling out your desired database user credentials. I’m also calling my user ‘redmine’. Check out the below figure for more information:
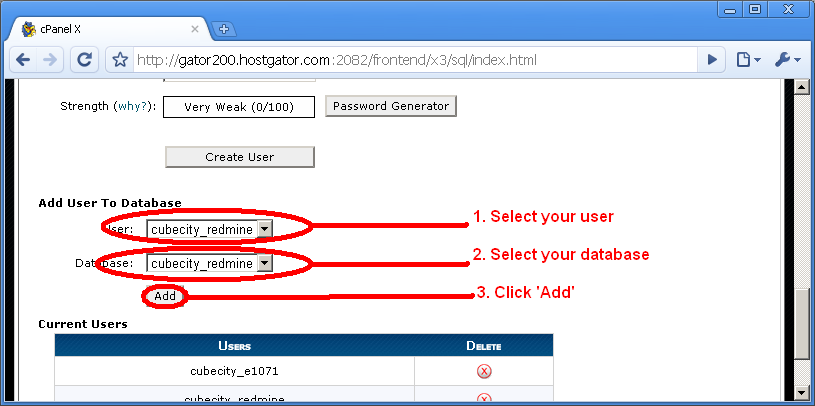
Next, in the Add User To Database section, let’s add our ‘redmine’ user to our ‘redmine’ database. Select your user from the dropdown, select your database from the dropdown, and click ‘Add’.
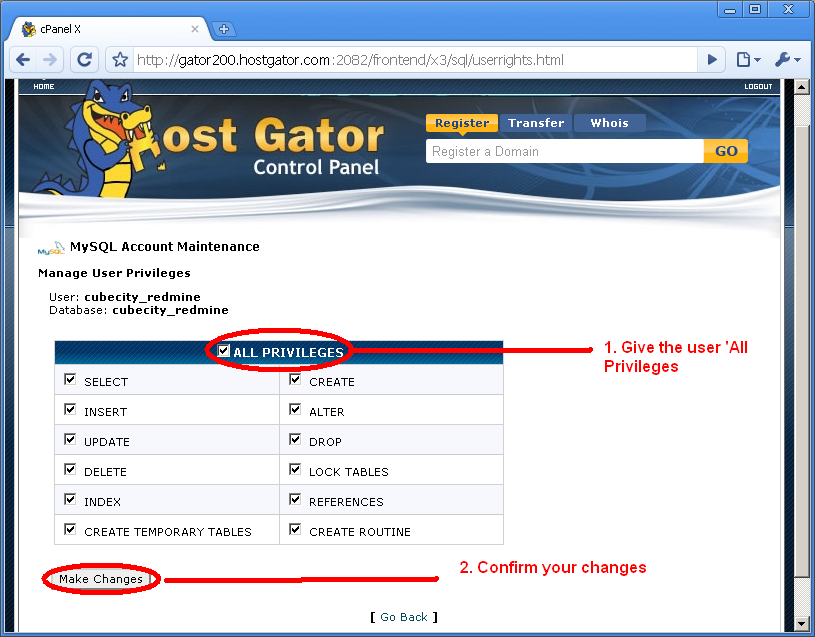
In the next screen that appears, just grant ‘All Privileges’.
Now, we have our database done. Let’s hook Rails up to this.
Step 4: Connect Rails to the database
This next section requires knowledge of SSH, and how to connect to the server with a client such as PuTTY. We’ll be executing some commands from SSH, and these are required for the application to function correctly.
Connect to your account via SSH. Contact us at support@hostgator.com if you do not know how to do this.
You should be looking at a screen similar to this:
Change directories to your rails_apps/redmine directory (or whatever you named your rails app in Step 1). You can do this by executing the following command:
cd rails_apps/redmine
Copy config/database.yml.example to config/database.yml and edit this file in order to configure your database settings for “production” environment. Do this with the following command:
cp config/database.yml.example config/database.yml
Next, let’s edit the file to add our MySQL credentials we created in Step 3. Execute the following command:
nano config/database.yml
You should see a screen that looks similar to this:
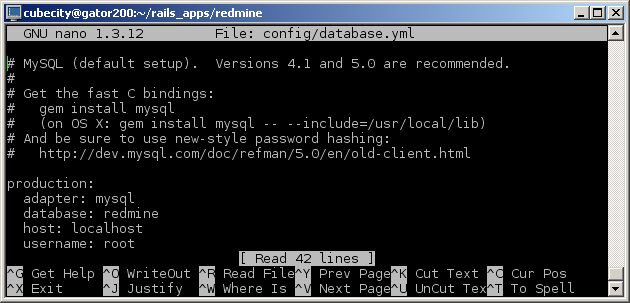
Go ahead and edit the settings under the production section. Here’s what my settings look like:
production:
adapter: mysql
database: cubecity_redmine
host: localhost
username: cubecity_redmine
password: q1w2e3r4
Of course, instead of ‘cubecity’ you’ll use your own username. The rest of this step for Redmine is reposted from Redmine’s guide for installing:
Execute the following code in SSH:
rake generate_session_store
Next, execute the following. It will create tables and an administrator account:
RAILS_ENV=production rake db:migrate
Insert default configuration data in database, by running the following command:
RAILS_ENV=production rake redmine:load_default_data
Step 5: Create redirects
Head back to cPanel. Go to your Ruby on Rails control panel, and look under the Create A Rewrite section. Click the ‘Create Rewrite’ button to create a rewrite for your application. This will create a .htaccess file in the directory of the domain you choose. We don’t really recommend installing rails applications to subdirectories unless you are experienced with ruby on rails. Note which domain you rewrite the site to, you’ll have to make a brief change to its .htaccess file.
Go back to cPanel and head to your File Manager. In the ‘Directory Selection’ popup, select ‘Document Root for:’, choose the domain you chose for your rewrite, make sure that ‘Show Hidden Files’ is checked, and click ‘Go’.
Select the .htaccess, and select ‘Edit’. You should see the following (or something similar, depending on what your domain is.):
RewriteEngine on
RewriteCond %{HTTP_HOST} ^rails.hgfix.net$ [OR]
RewriteCond %{HTTP_HOST} ^www.rails.hgfix.net$
RewriteRule ^/?$ “http\:\/\/127\.0\.0\.1\:12001%{REQUEST_URI}” [P,QSA,L]
Change this line:
RewriteRule ^/?$ “http\:\/\/127\.0\.0\.1\:12001%{REQUEST_URI}” [P,QSA,L]
To match this:
RewriteRule ^(.*)$ “http\:\/\/127\.0\.0\.1\:12001%{REQUEST_URI}” [P,QSA,L]
Note the change in the second set of characters ==> ^/?$ to ^(.*)$
Click ‘Save Changes’
Step 6: Run application
At this point, everything should theoretically run by browsing to the domain at which you installed your rails application.
http://support.hostgator.com/articles/specialized-help/technical/how-do-i-start-using-ruby-on-rails