July 14, 2021 . 4 MIN READ
http://mymobilek65.blogspot.com/2015/09/how-to-connet-ionic-mobile-application.html
Go to wamp –>www–>my project and create .php file. Rename it to query.php (you can give any name you want).
In this example I write php code to retrieve data from MySQL database.
| <?php | |
| header(“Access-Control-Allow-Origin: *”); | |
| $mysql_host = “localhost:3306”; | |
| $mysql_database = “FirstDB”; | |
| $mysql_user = “root”; | |
| $mysql_password = “”; | |
| // Create connection | |
| $conn = new mysqli($mysql_host, $mysql_user, $mysql_password,$mysql_database); | |
| // Check connection | |
| if ($conn->connect_error) { | |
| die(“Connection failed: ” . $conn->connect_error); | |
| } | |
| $sql = “SELECT Username,Password FROM Employee”; | |
| $result = $conn->query($sql); | |
| $outp = “”; | |
| while($rs = $result->fetch_array(MYSQLI_ASSOC)) { | |
| if ($outp != “”) {$outp .= “,”;} | |
| $outp .= ‘{“Username”:”‘ . $rs[“Username”] . ‘”,’; | |
| $outp .= ‘”Password”:”‘ . $rs[“Password”] . ‘”}’; | |
| } | |
| $outp ='{ “records”:[ ‘.$outp.’ ]}’; | |
| $conn->close(); | |
| echo($outp); | |
| ?> |
view rawmysql.php hosted with ❤ by GitHub
You need to give your server name to $mysql_host variable. And also database name, username & password to other variables.
Create connection using mysqli() function.
Then write query function to select data from MySQL database.
Cross-Origin Resource Sharing (CORS) is a specification that enables truly open access across domain-boundaries. If you serve public content, please consider using CORS to open it up for universal JavaScript/browser access.
Enable CORS in PHP we use this code in .php file.
header(“Access-Control-Allow-Origin: *”);
Enable CORS in Apache server
http://enable-cors.org/server_apache.html
After that run http://localhost:81//my%20project/query1.php .you need to change .php file according to your name.
In your browser you can see Json array like this. That data bind with records. We need that URL later.
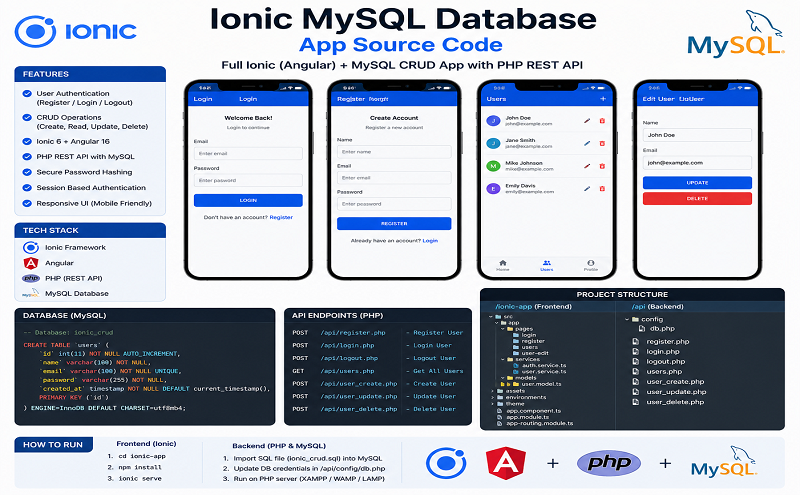
Part IV: Create mobile application Using Ionic framework
I’m use IONIC framework with angularJs to build mobile application.
http://ionicframework.com/docs/overview/
Use command prompt to create new ionic application
ionic start “project_name” blank
cd “project_name”
ionic platform add android
Now you can see folder create in your computer called “project_name”.
Double click “project”àwwwàindex.html
| <!DOCTYPE html> | |
| <html> | |
| <head> | |
| <meta charset=”utf-8″> | |
| <meta name=”viewport” content=”initial-scale=1, maximum-scale=1, user-scalable=no, width=device-width”> | |
| <title></title> | |
| <link href=”lib/ionic/css/ionic.css” rel=”stylesheet”> | |
| <link href=”css/style.css” rel=”stylesheet”> | |
| <!– IF using Sass (run gulp sass first), then uncomment below and remove the CSS includes above | |
| <link href=”css/ionic.app.css” rel=”stylesheet”> | |
| –> | |
| <!– ionic/angularjs js –> | |
| <script src=”lib/ionic/js/ionic.bundle.js”></script> | |
| <!– cordova script (this will be a 404 during development) –> | |
| <script src=”cordova.js”></script> | |
| <!– your app’s js –> | |
| <script src=”js/app.js”></script> | |
| </head> | |
| <body ng-app=”starter”> | |
| <ion-pane> | |
| <ion-header-bar class=”bar-stable”> | |
| <h1 class=”title”>Ionic Blank Starter</h1> | |
| </ion-header-bar> | |
| <ion-content> | |
| </ion-content> | |
| </ion-pane> | |
| </body> | |
| </html> |
view rawindex.html hosted with ❤ by GitHub
Double click “project”àwwwàindex.htmlàapp.js
| var app = angular.module(‘starter’, [‘ionic’]); | |
| app.run(function($ionicPlatform) { | |
| $ionicPlatform.ready(function() { | |
| // Hide the accessory bar by default (remove this to show the accessory bar above the keyboard | |
| // for form inputs) | |
| if(window.cordova && window.cordova.plugins.Keyboard) { | |
| cordova.plugins.Keyboard.hideKeyboardAccessoryBar(true); | |
| } | |
| if(window.StatusBar) { | |
| StatusBar.styleDefault(); | |
| } | |
| }); | |
| }); |
view rawapp.js hosted with ❤ by GitHub
This is the two main file we use to create our application.
Part V: Update Source code to get URL data
We need to get data to device from http://localhost:81//my%20project/query1.phpURL.Using AngulasJs, We need to write this simple code in app.js with $http.get() function and make sure you insert correct URL into that and response.records this records variable should be same variable given in PHP code.
| var app = angular.module(‘starter’, [‘ionic’]); | |
| app.run(function($ionicPlatform) { | |
| $ionicPlatform.ready(function() { | |
| // Hide the accessory bar by default (remove this to show the accessory bar above the keyboard | |
| // for form inputs) | |
| if(window.cordova && window.cordova.plugins.Keyboard) { | |
| cordova.plugins.Keyboard.hideKeyboardAccessoryBar(true); | |
| } | |
| if(window.StatusBar) { | |
| StatusBar.styleDefault(); | |
| } | |
| }); | |
| }); | |
| app.controller(‘customersCtrl’, function($scope, $http) { | |
| $http.get(“http://localhost:81//my%20project/query1.php”) | |
| .success(function (response) {$scope.names = response.records;}); | |
| }); |
view rawapp.js hosted with ❤ by GitHub
After that go to index.html and within <ion-content> tag, create new <div> tag and place
ng-controller directive. Then using ng-repeat directive called data from that URL.
| <ion-content> | |
| <div ng-controller=”customersCtrl”> | |
| <ul> | |
| <li ng-repeat=”x in names”> | |
| {{ x.Username }} | |
| {{ x.Password }} | |
| </li> | |
| </ul> | |
| </div> | |
| </ion-content> |
view rawindex.html hosted with ❤ by GitHub
Make sure Username & Password should be same variables in PHP code.
And finally we did.
You can run index.html and see the output. Make sure you run wamp server when you run the code.
You need to host your database & PHP code using online server and give that database server to .php code and php URL to AngularJs $http.get() code.
Then you can use command prompt and type
Ionic build android
To create .apk file.
Output: