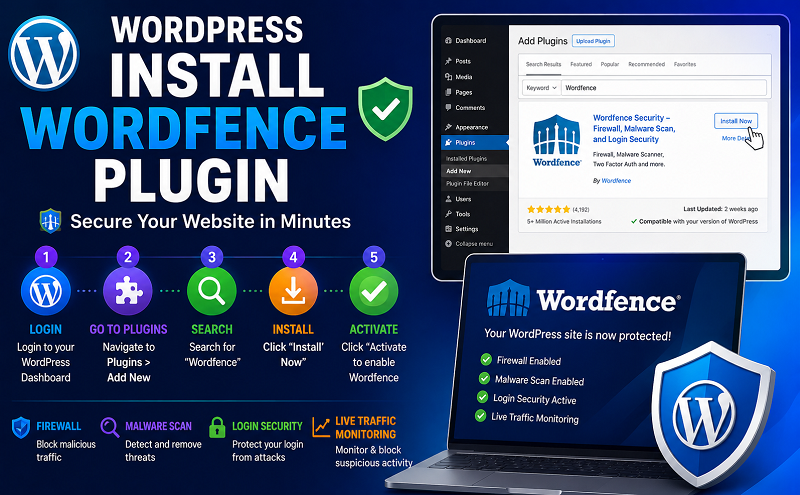
Secure your website using the following steps to install Wordfence:
- Install Wordfence automatically or by uploading the ZIP file.
- Activate the Wordfence through the ‘Plugins’ menu in WordPress. Wordfence is now activated.
- Go to the scan menu and start your first scan. Scheduled scanning will also be enabled.
- Once your first scan has completed, a list of threats will appear. Go through them one by one to secure your site.
- Visit the Wordfence options page to enter your email address so that you can receive email security alerts.
- Optionally, change your security level or adjust the advanced options to set individual scanning and protection options for your site.
- Click the “Live Traffic” menu option to watch your site activity in real-time. Situational awareness is an important part of website security.
To install Wordfence on WordPress Multi-Site installations:
- Install Wordfence via the plugin directory or by uploading the ZIP file.
- Network Activate Wordfence. This step is important because until you network activate it, your sites will see the plugin option on their plugins menu. Once activated that option disappears.
- Now that Wordfence is network activated it will appear on your Network Admin menu. Wordfence will not appear on any individual site’s menu.
- Go to the “Scan” menu and start your first scan.
- Wordfence will do a scan of all files in your WordPress installation including those in the blogs.dir directory of your individual sites.
- Live Traffic will appear for ALL sites in your network. If you have a heavily trafficked system you may want to disable live traffic which will stop logging to the DB.
- Firewall rules and login rules apply to the WHOLE system. So if you fail a login on site1.example.com and site2.example.com it counts as 2 failures. Crawler traffic is counted between blogs, so if you hit three sites in the network, all the hits are totalled and that counts as the rate you’re accessing the system.
https://wordpress.org/plugins/wordfence/installation/